Create Application
- Create working directory. Create directory
converterusing commandmkdir converter; - Download Fase Library. Download
fase_librepository from here intoconverterdirectory sofase_liblocate asconverter/fase_lib; - Define Service. Move written file
service.pyintoconverterdirectory; - Create entry point:
- Create file
application.py; - Import main Fase modules, register
ConverterService, configurate Fase and referapplicationvariable:
- Create file
import os

# Import service.
import service as converter_service

# Import main Fase modules.
from fase_lib import fase
from fase_lib import fase_config
from fase_lib import fase_application


# Register service.
fase.Service.RegisterService(converter_service.ConverterService)

# Configurate Fase using config file which path is in environment variable.
fase_config.Configurate(os.environ['FASE_CONFIG_FILENAME'])

# Refer to application variable.
application = fase_application.application
NOTE. Code uses environment variable FASE_CONFIG_FILENAME which will have to be define in AWS Elastic
Beanstalk.
Optionally. Run Server and Application Locally
- Create runner:
- Create file
run_locally.py; - Import Fase tool to run Application using Python Tkinter, register service and run Server and Application locally:
- Create file
import os

# Import Fase tool to run Application.
from fase_lib.tools import fase_run_util


def main(argv):
  # Register service.
  import service as converter_service
  from fase_lib import fase
  fase.Service.RegisterService(converter_service.ConverterService)

  # Run Application.
  server_info = fase_run_util.RunServer()
  fase_run_util.RunClient(fase_server_url=server_info.server_url)
  fase_run_util.StopServer(server_info)


if __name__ == '__main__':
  main(os.sys.argv)
- Run. Run Server and Application locally using command
python3 run_locally.py;
Prepare Archive with Source Code
NOTE. Fase Server can work with set of tables with different suffixes. This allows to deploy several instances, for example for production and testing. This instruction describes how to deploy tables with _prod suffix.
- Define requirements. A file
requirements.txtwhich lists all libraries needed to run an environment is needed. As template Copyrequirements.txtfromfase_libdirectory using commandcp fase_lib/requirements.txt ./. Add libraries which Service needs apart from that. - Define Fase config. A config file for Fase Server is needed. As template copy file
prod_fase.config into
converterdirectory using commandcp fase_lib/tools/prod_fase.config ./; - Create archive. Archive the source using command
zip -r Converter.zip *;
Configurate Permissions
- Log in into AWS.
- Create policy for Fase Server to access DynamoDB. Go to Services->IAM, go to Policies, click Create policy, select JSON, copy content of file dynamo_db_policy_prod.json, click Review policy, enter name FaseDynamoDBPolicyProd, click Create policy;
NOTE. Script generate_dynamo_db_policy.py allows to generate such policy with any suffix.
-
Create policy for Fase Server to send SMS if needed. In case of an Application uses signing in functionality, create policy for Fase Server to send SMS. Go to Services->IAM, go to Policies, click Create policy, select JSON, copy content of file sns_policy.json, click Review policy, enter name FaseSNSPolicy, click Create policy;
-
Create role with policies. Go to Services->IAM, go to Roles, click Create role, choose AWS service, choose EC2, click Next: Permissions. In policies list find and add FaseDynamoDBPolicyProd and, if created, FaseSNSPolicy. Click Next: Tags, click Next: Review, as Role name enter ConverterFaseProd, click Create role;
Deploy Server
-
Create Application. Go to Services->Elastic Beanstalk, click Create New Application, as Application Name enter ConverterFase, click Create;

-
Create Server. Above just create Application, click Actions, choose Create environment, choose Web server environment, click Select. As Environment name enter converterfase-env-prod, copy it to domain, for Preconfigured platform choose Python, for Application code choose Upload your code and find archive created above, click Create environment and wait until environment is created; Choose just created converterfase-env-prod;
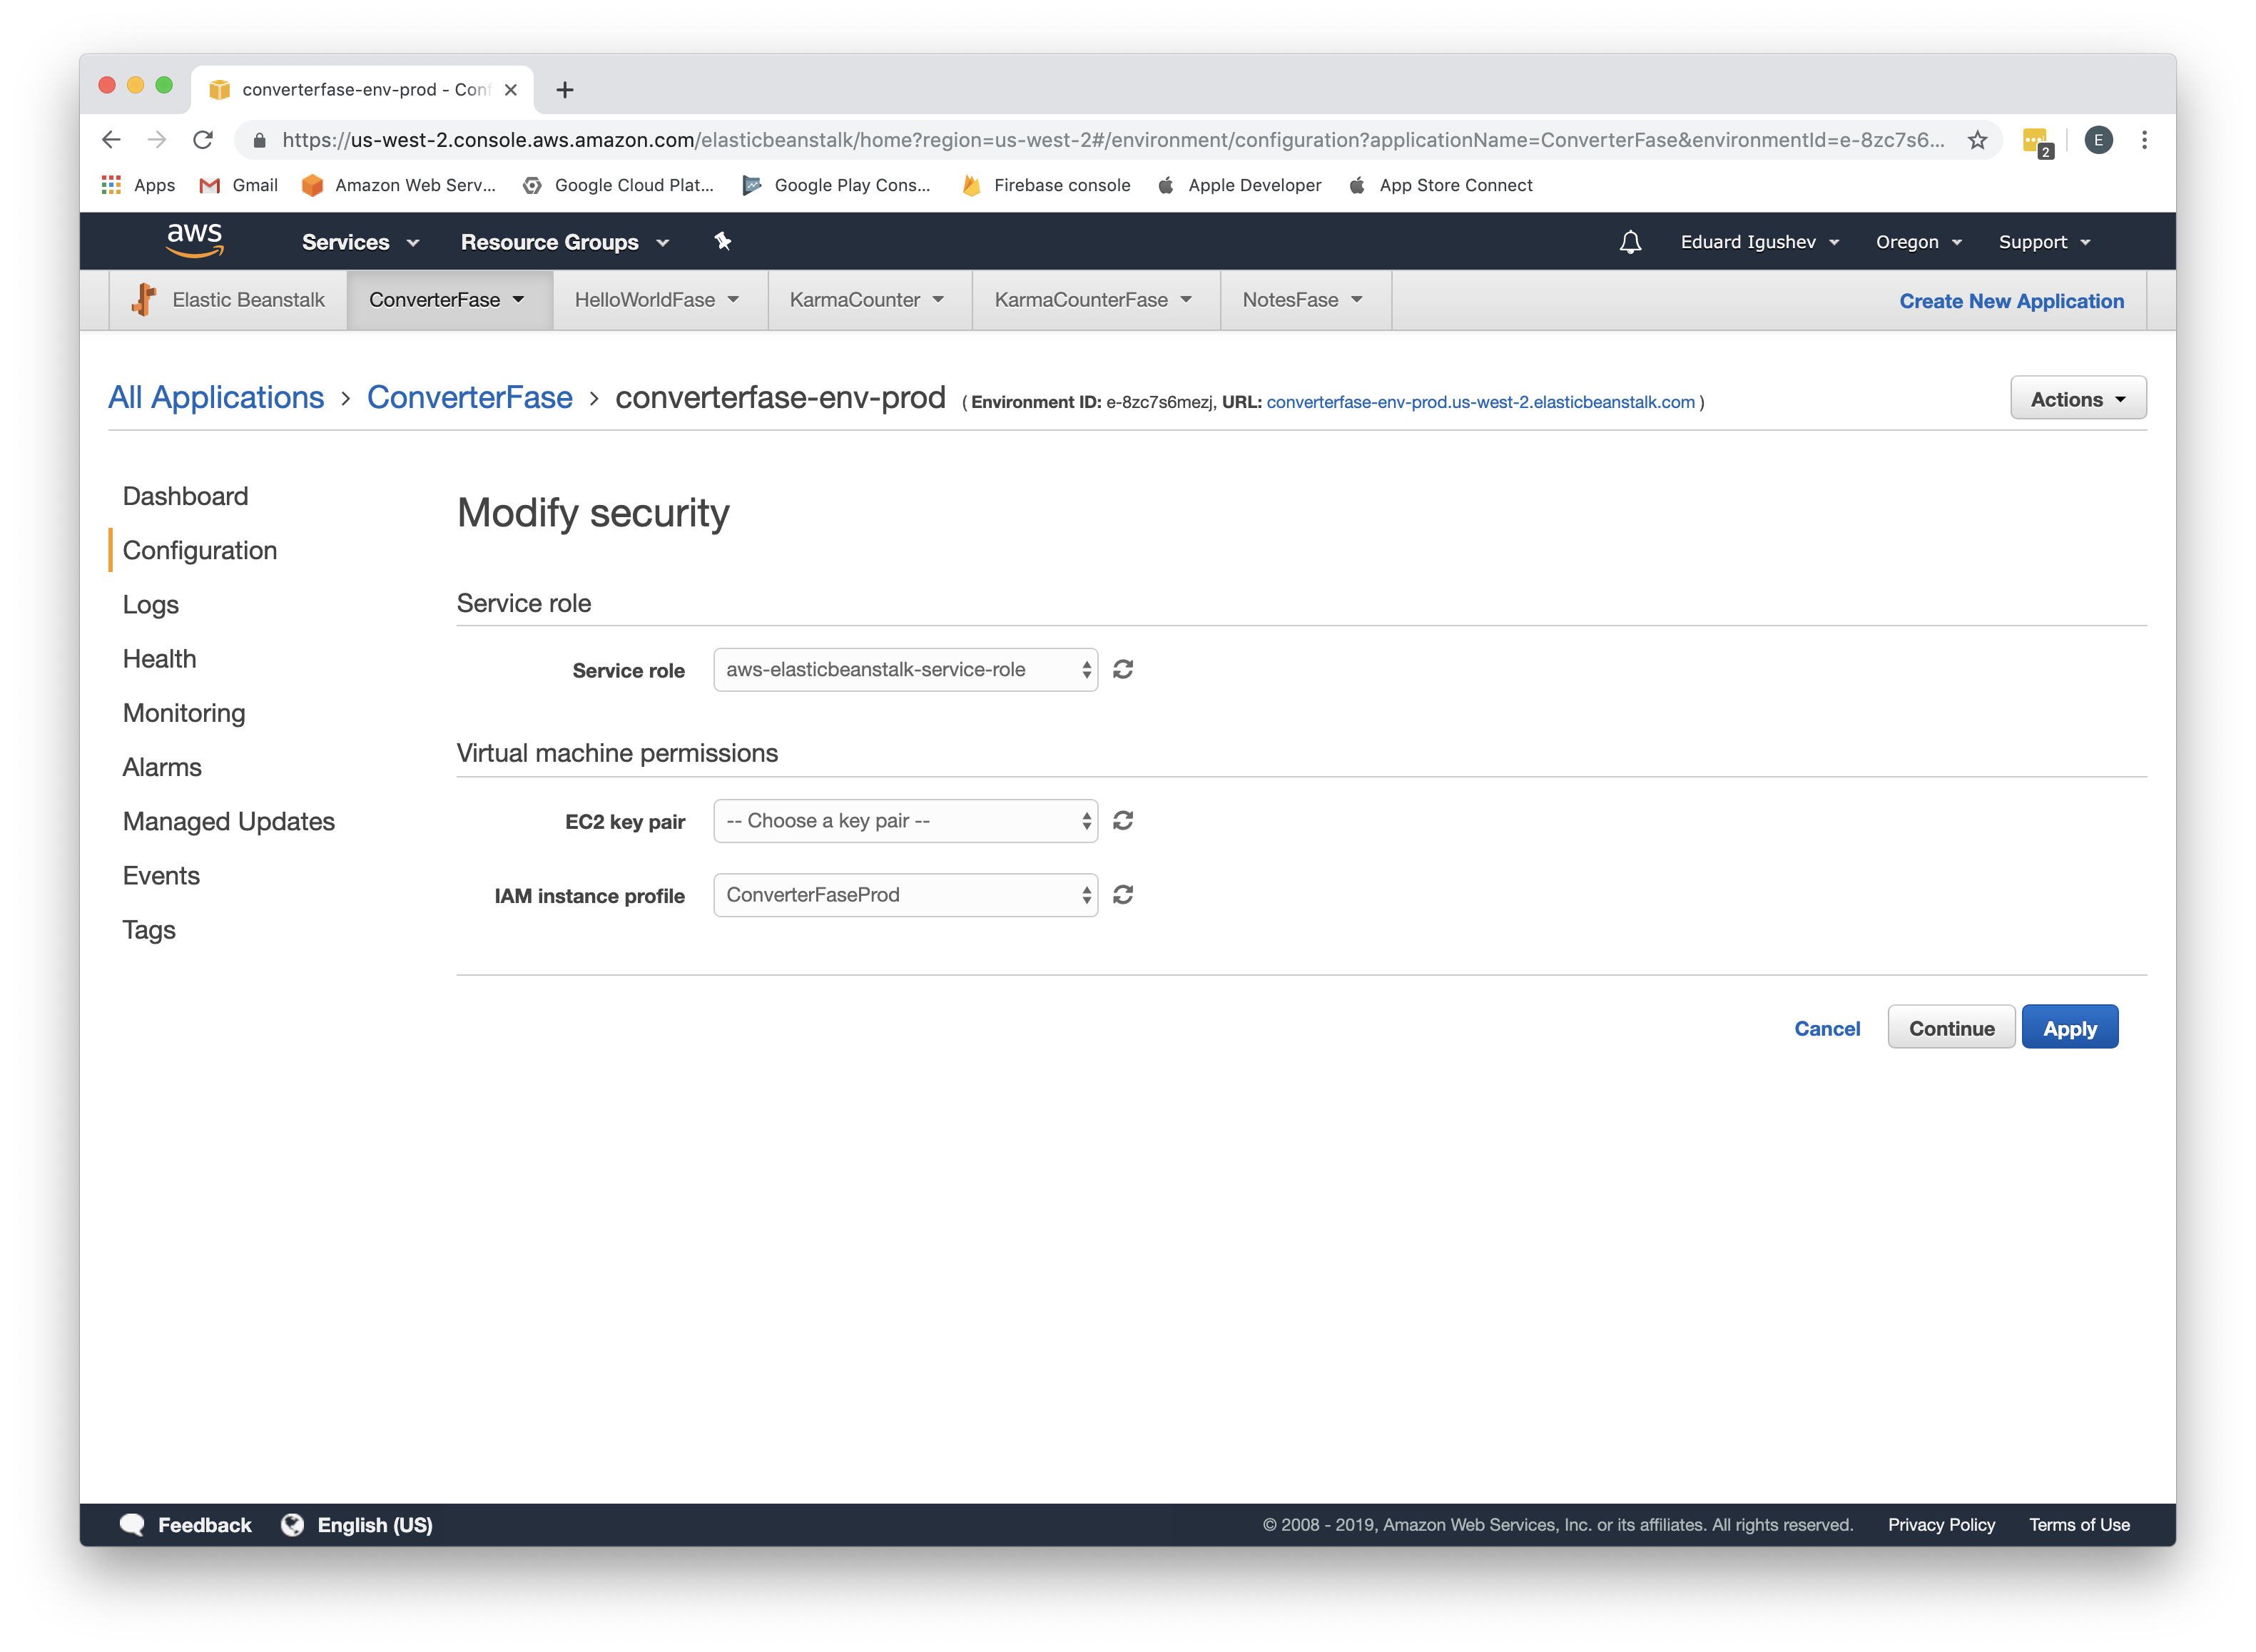
-
Assign created role. Go to Configuration->Security, as IAM instance profile choose ConverterFaseProd, click Apply, click Confirm;
-
Define environment variable with Fase config. Go to Configuration->Software, for Environment properties as Name and Value add
FASE_CONFIG_FILENAMEandprod_fase.config, click Apply;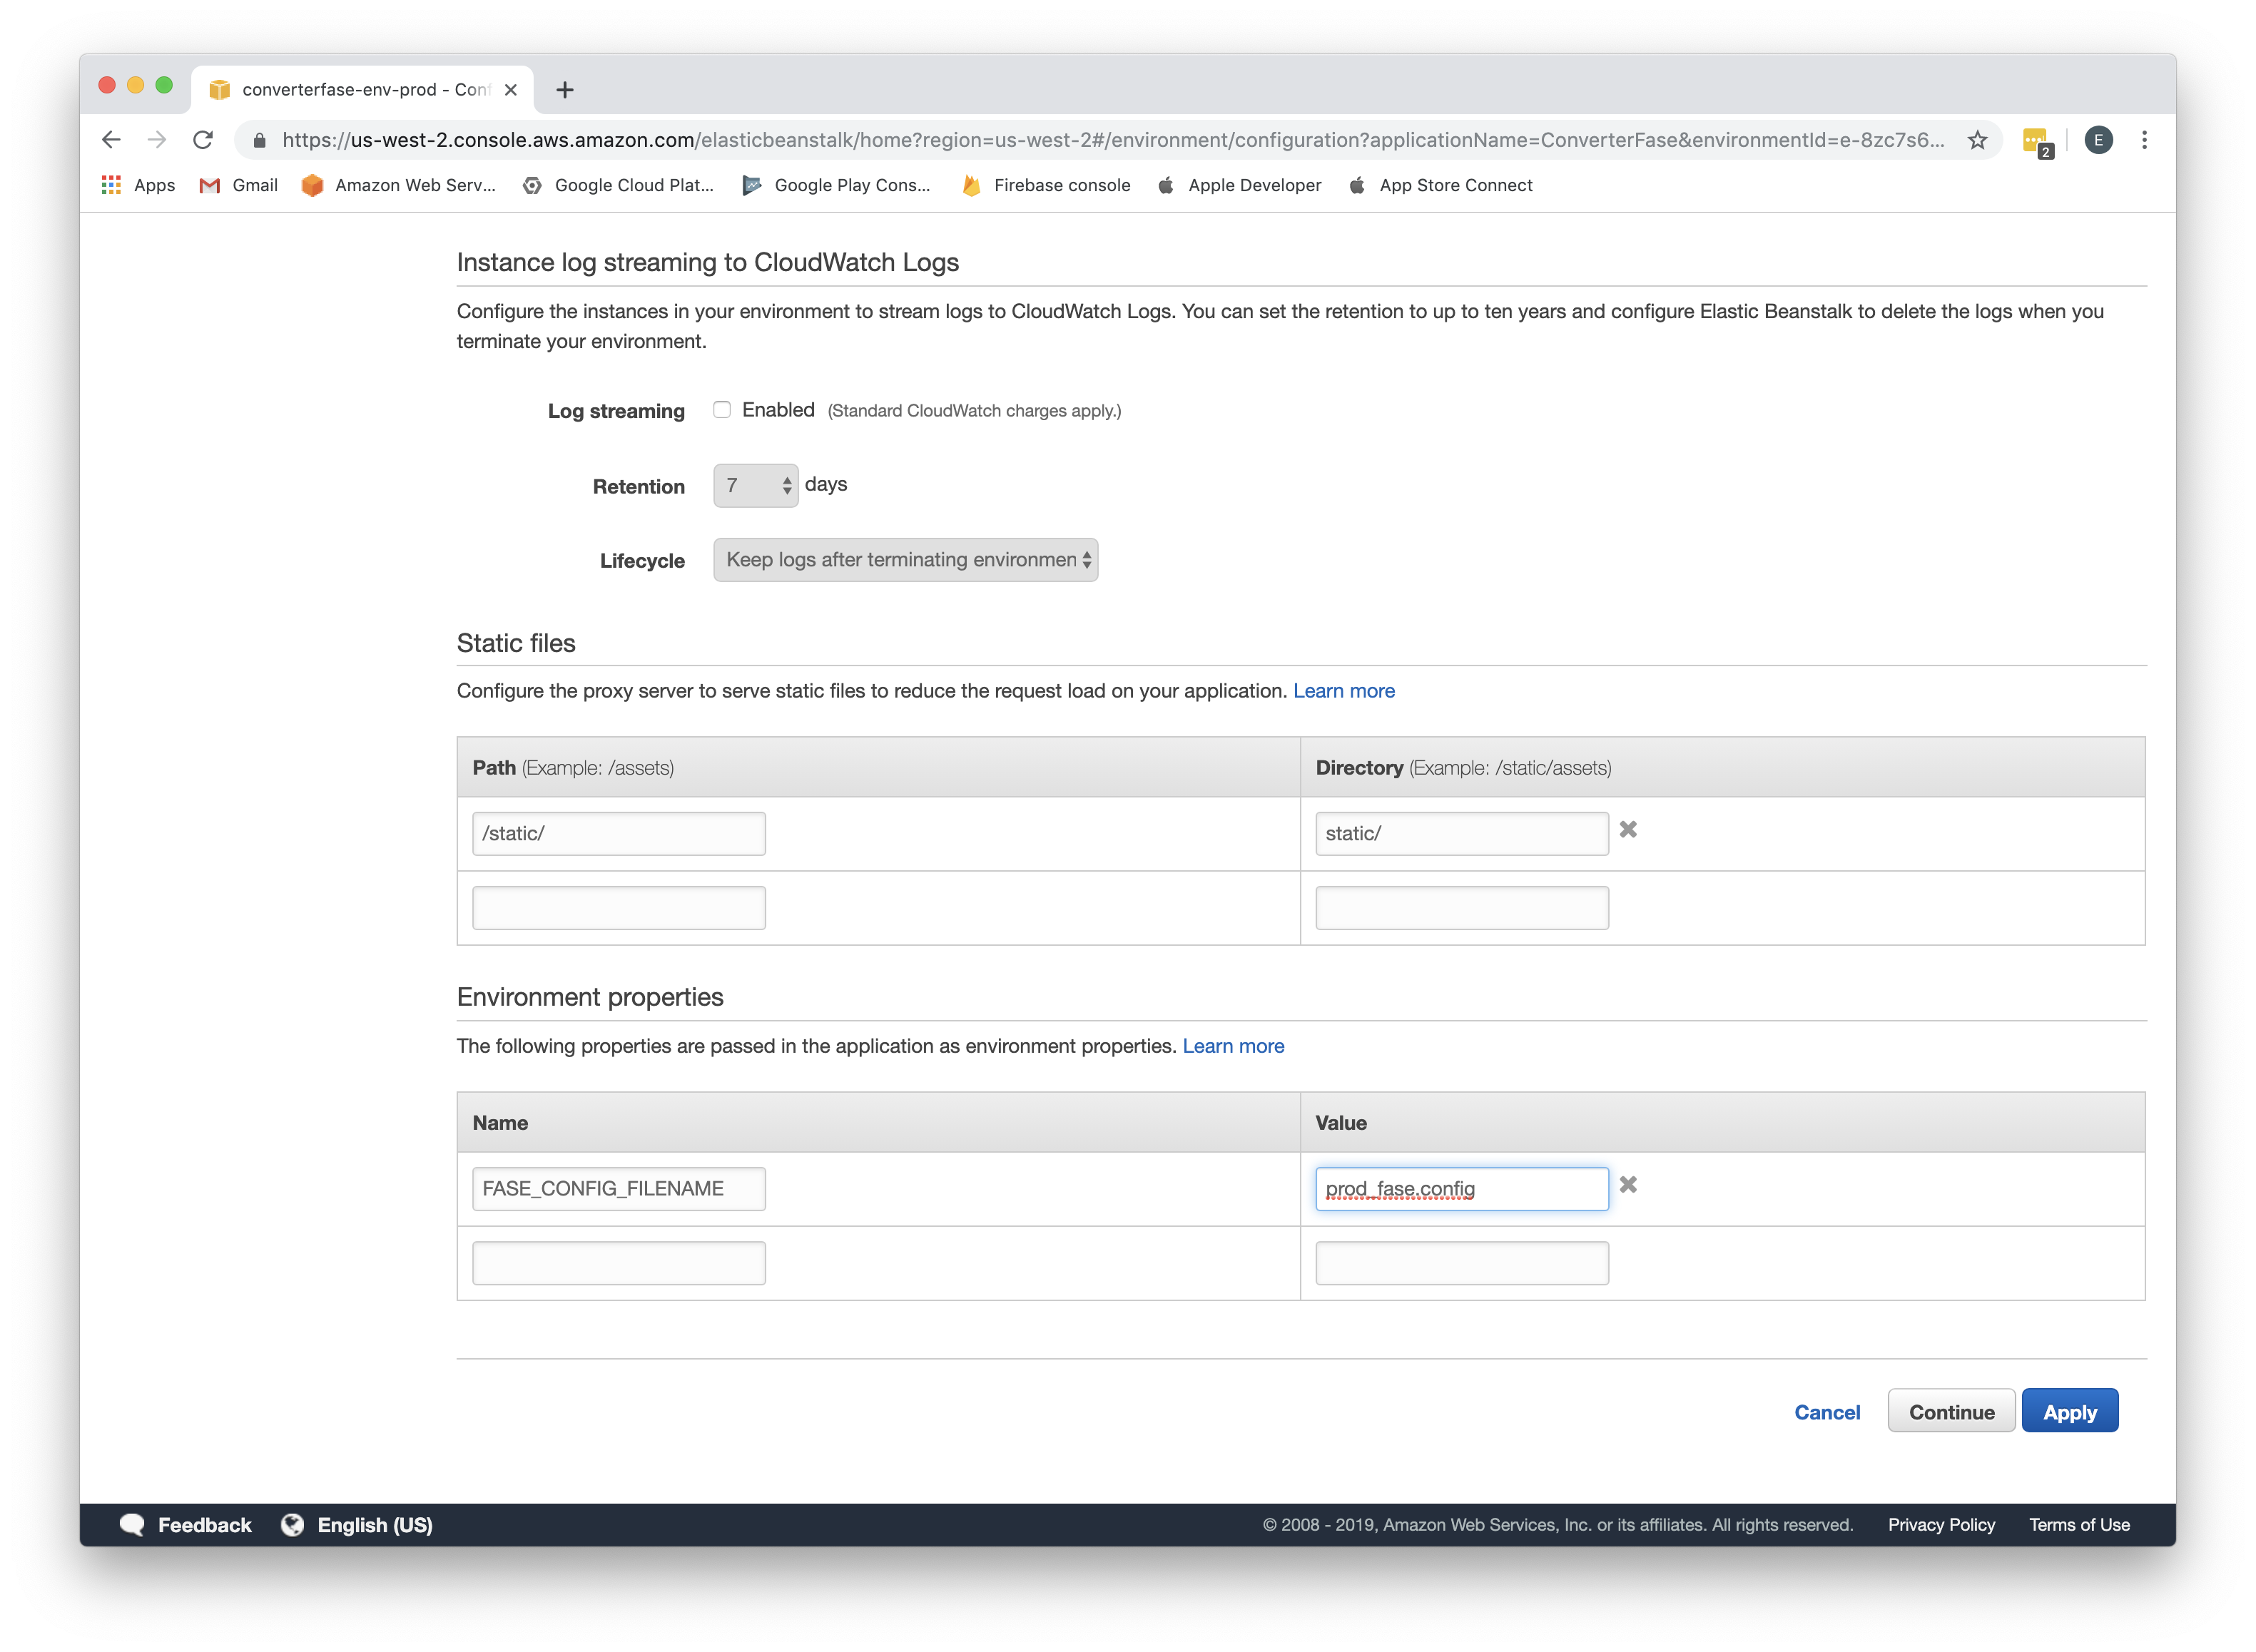
Create Database
- Send command to create tables. Using software like Postman send POST request to URL
converterfase-env-prod.us-west-2.elasticbeanstalk.com/sendinternalcommandwith following body:
{
"command":"createdb"
}
Reponse with code 200 should be received. This request creates database for Fase Server.
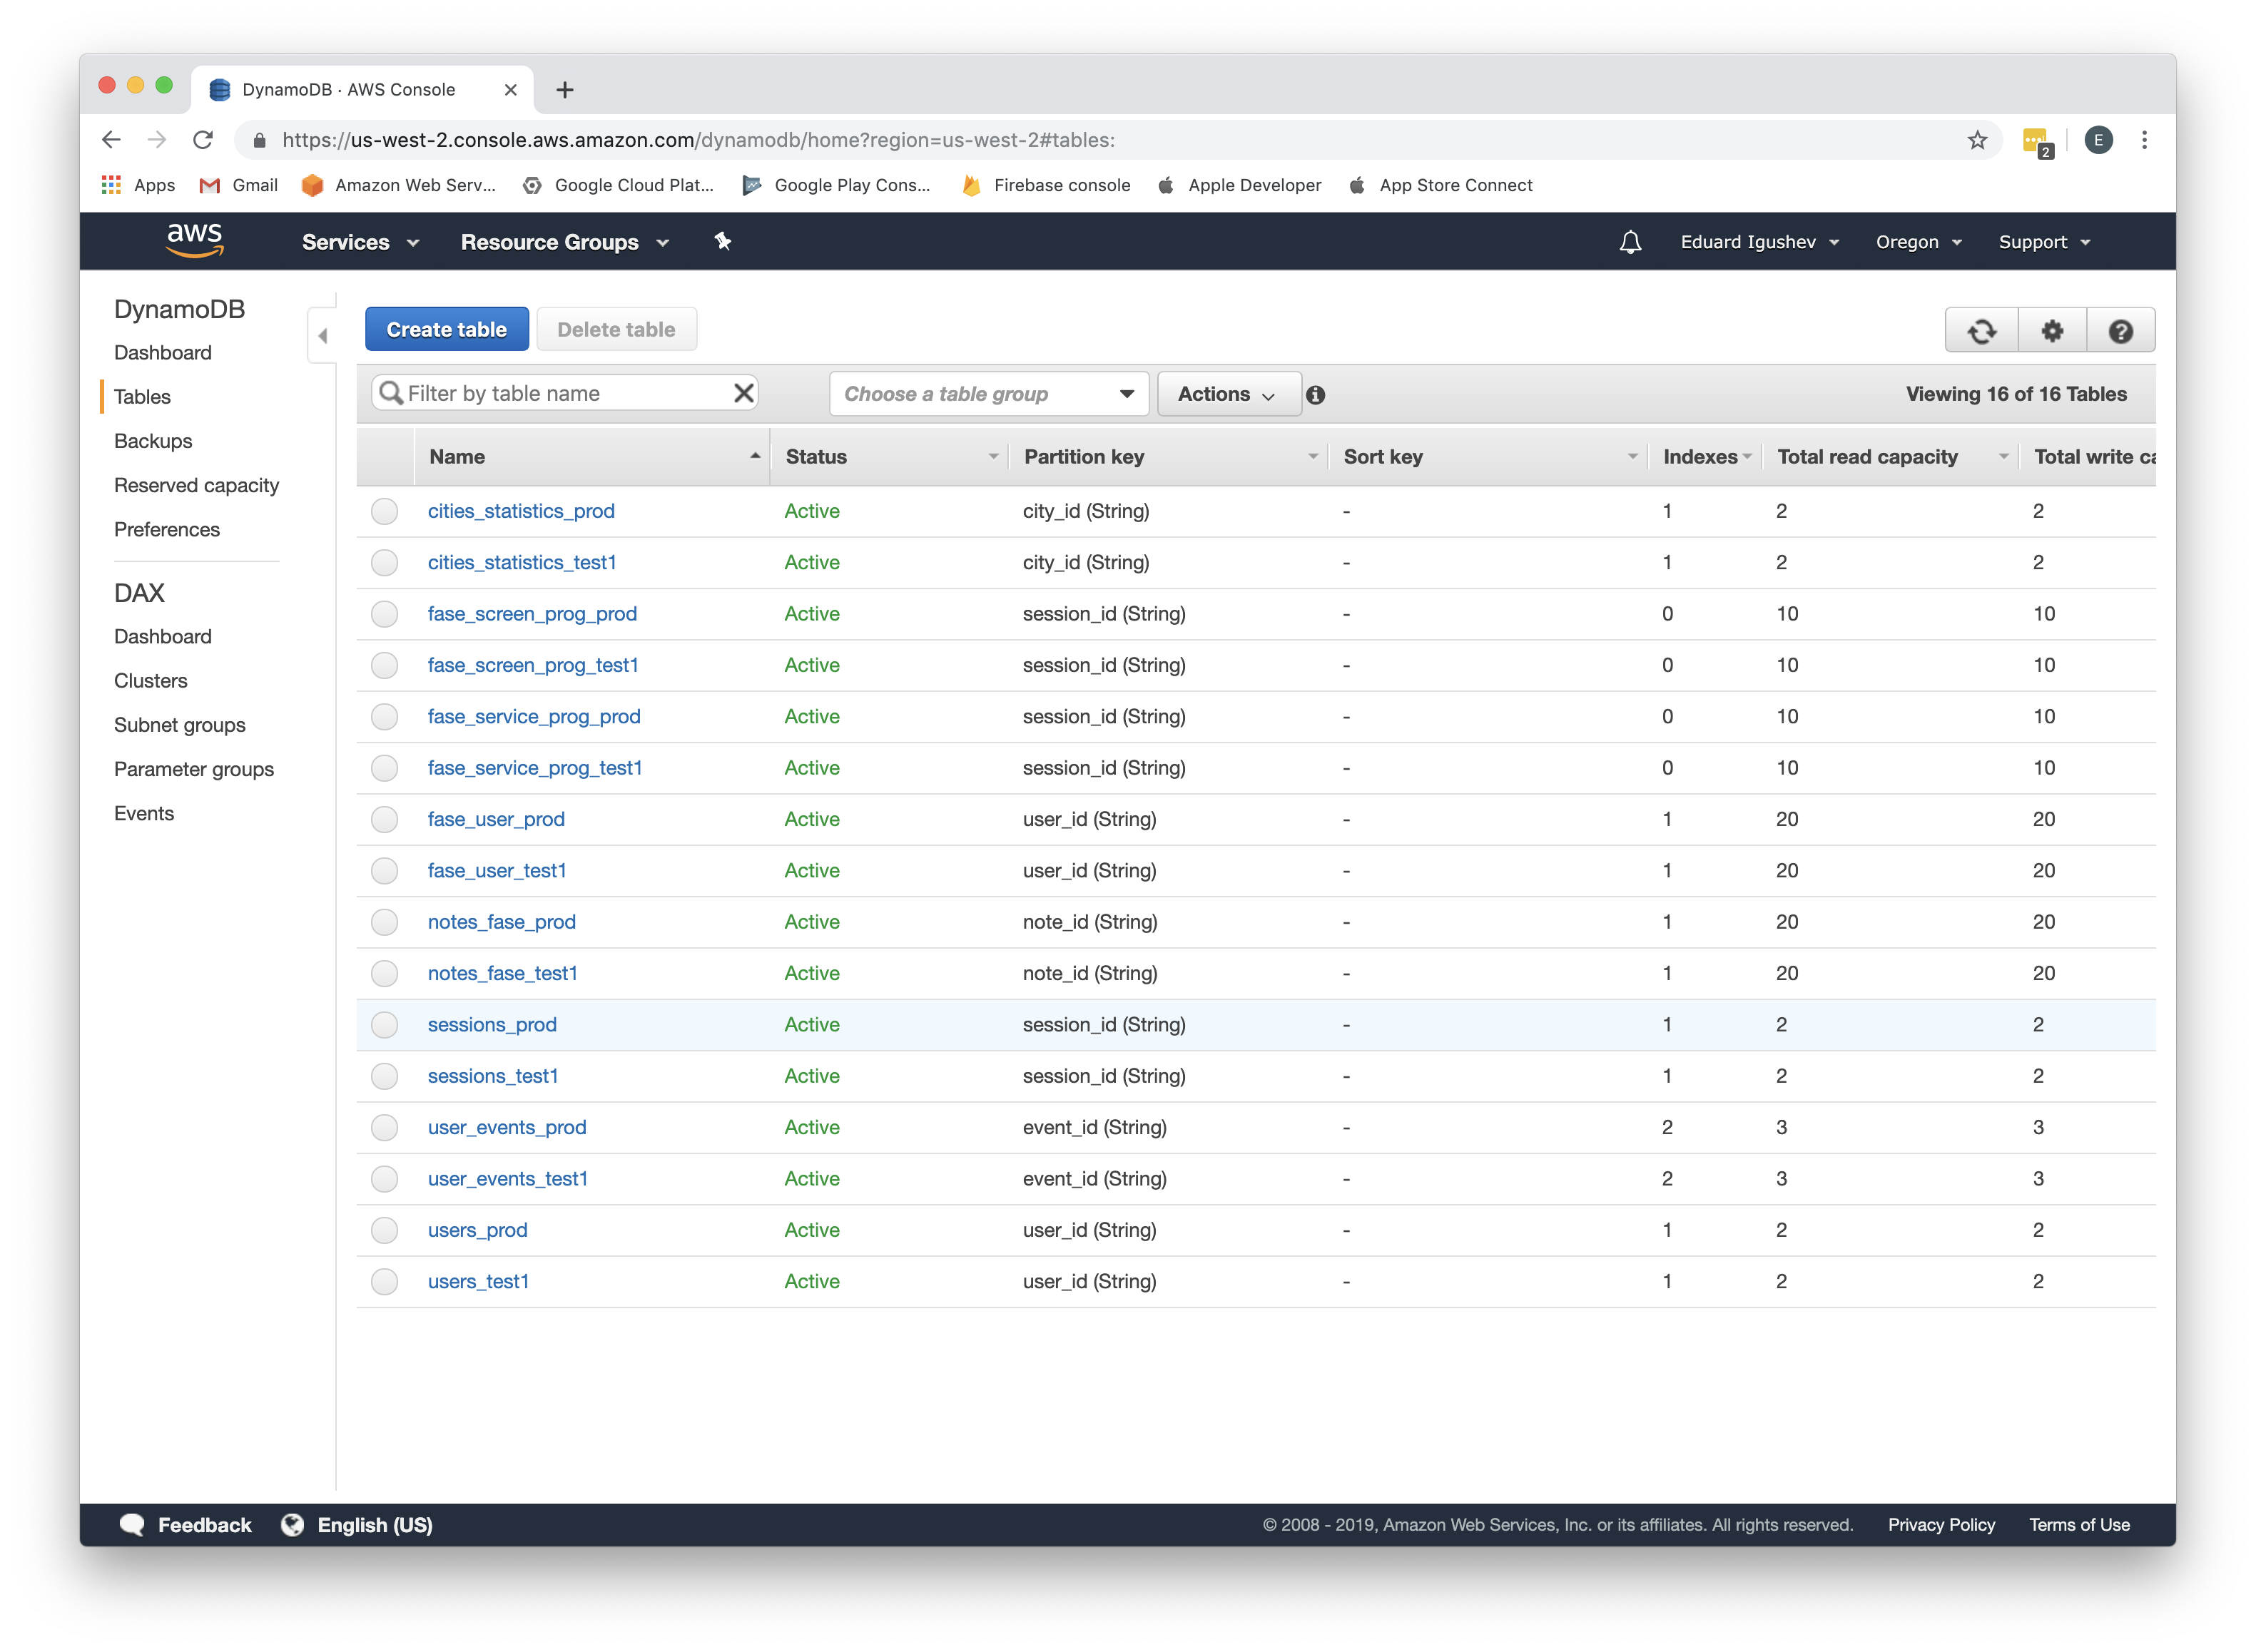
- Confirm that tables have been created successfully. Go Services->DynamoDB, go to Tables and make sure that
tables with prefix fase_ have been created;
Optionally. Connect to Server and run Application Locally
- Create runner:
- Create file
run_connect.py; - Import Fase tool to run Application using Python Tkinter, register service and connect to Server and run Application locally:
- Create file
import os

# Import Fase tool to run Application.
from fase_lib.tools import fase_run_util

# Define constant to connect to Fase Server running on AWS.
FASE_SERVER_URL = 'http://converterfase-env-prod.us-west-2.elasticbeanstalk.com'
FASE_SESSION_INFO_FILENAME = 'session_info'


def main(argv):
    session_info_filepath = FASE_SESSION_INFO_FILENAME
    fase_run_util.RunClient(fase_server_url=FASE_SERVER_URL, session_info_filepath=session_info_filepath)


if __name__ == '__main__':
  main(os.sys.argv)
- Run. Connect to Server and run Application locally using command
python3 run_locally.py;
An initial screen should be seen. That means Fase Server has been deployed correctly.
